一、安装 Nginx Helper 插件
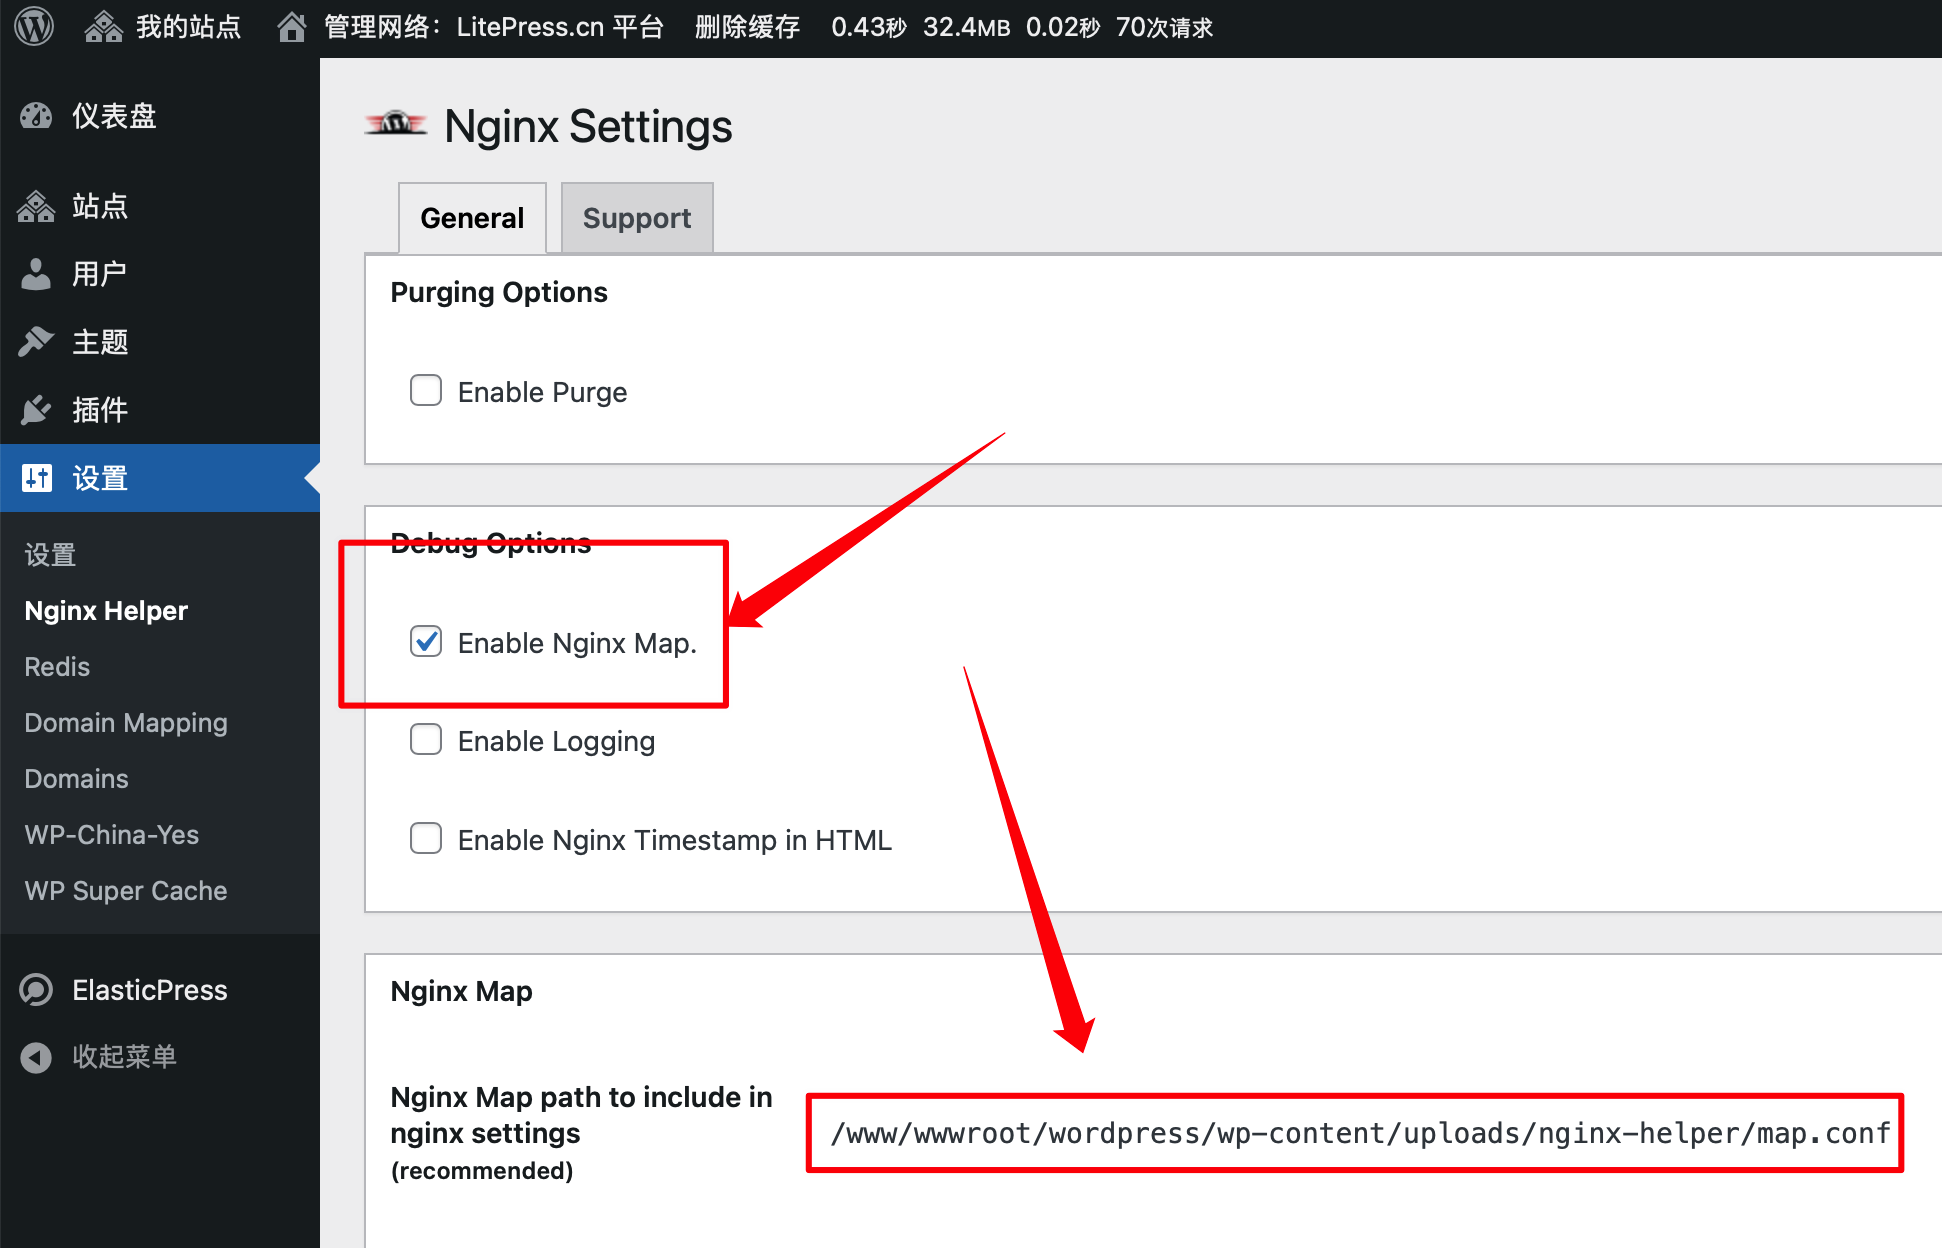
Nginx Helper 工具能够为我们创建 Nginx map 的对应关系,这对之后设置 Nginx 的伪静态规则十分有益。下载并在站点网络中激活此工具后,直接在工具的配置页面选择Enable Nginx Map.这一选项并保存。随后,你会看到该工具为你产生的映射文件详情。
二、修改网站配置文件
采用宝塔面板作为示例,在网站配置的server部分上面插入以下代码,然后替换为Nginx Helper工具所输出的映射文件内容。
这是子目录的:
map $uri $blogname {
    ~^(?<blogpath>/[^/]+/)files/(.*)  $blogpath ;
}

map $blogname $blogid {
    default -999;
    include 映射文件路径.conf;
}这是子域名的:
map $http_host $blogid {
    default       -999;
    include 映射文件路径.conf;
}
保存完成后应如下图所示:

三、设置 Nginx 伪静态规则
以宝塔面板为参考,进入网站的伪静态设置界面,将下面的代码输入进去:
以下是针对子目录的代码:
# 避免 PHP 读取静态文件
location ^~ /blogs.dir {
  internal;
  alias /网站目录/wp-content/blogs.dir ;
  access_log off; log_not_found off; expires max;
}
# 通过 map 读取对应站点的文件
location ~ ^(/[^/]+/)?files/(.+) {
  try_files /wp-content/blogs.dir/$blogid/files/$2 /wp-includes/ms-files.php?file=$2 ;
  access_log off; log_not_found off; expires max;
}
# 重写
if (!-e $request_filename) {
  rewrite /wp-admin$ $scheme://$host$request_uri/ permanent;
  rewrite ^(/[^/]+)?(/wp-.*) $2 last;
  rewrite ^(/[^/]+)?(/.*.php) $2 last;
}
# 重写
location / {
  try_files $uri $uri/ /index.php?$args ;
}这是子域名的:
# 避免 PHP 读取静态文件
location ^~ /blogs.dir {
  internal;
  alias /网站目录/wp-content/blogs.dir ;
  access_log off; log_not_found off; expires max;
}
# 通过 map 读取对应站点的文件
location ~ ^/files/(.*)$ {
  try_files /wp-content/blogs.dir/$blogid/$uri /wp-includes/ms-files.php?file=$1 ;
  access_log off; log_not_found off; expires max;
}
# 重写
location / {
  try_files $uri $uri/ /index.php?$args ;
}
四、大功告成
如果您正在使用WP-Super-Cache或者W3 Total Cache插件,您可以前往https://wordpress.org/support/article/nginx/#wp-super-cache-rules,获取它们所需的Nginx规则。然后,将这些规则替换上述提供的相应部分,这将有助于在绕过PHP的情况下最大化提升性能。
© 版权声明
声明:本站所有文章,如无特殊说明或标注,均为本站原创发布。任何个人或组织,在未征得本站同意时,禁止复制、盗用、采集、发布本站内容到任何网站、书籍等各类媒体平台。如若本站内容侵犯了原著者的合法权益,可联系我们进行处理。
THE END

